Friday, August 26, 2011

Shepherd's Pie (Cottage Pie) with Zucchini & Squash


Traditional English Shepherd's Pie is made with lamb or mutton, while the same dish made with ground beef as a meat substitute is known as Cottage Pie. So, technically this is a Cottage Pie, but Fred will argue that it's a Shepherd's Pie because Shepherd's Pie is made with ground beef. I have tried to prove him wrong about it in the past but he simply does not agree. Research and common sense led me tho this - Lamb and mutton were traditionally used because they were what was readily available, while today ground beef is more accessible and inexpensive, so that is what is typically used today. However, I digress, this meal was for our anniversary celebration. One, because it's what I had around, and two, I thought it played into the argument we had once had over the dish. It turned out delicious and he had 3 helpings!

This recipe is super simple but I made some fun substitutions since I had just brought home some fresh vegi's from my momma's garden:

Meat filling:

3 cloves garlic, minced
1 cup sweet onion, diced
1 tbsp. olive oil
1/4 cup red wine
1/4 cup Worcestershire
1 lb. ground beef
1/4 tsp. salt
1/4 tsp. pepper

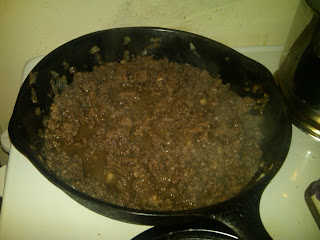
Sweat the garlic, onions and olive oil in a sauce pan. Add in red wine and Worcestershire to deglaze the pan, then add in ground beef and reduce on medium heat while preparing the other ingredients. I cooked down the ground beef in my cast iron skillet because I intended to bake the dish in the skillet to finish. You can also use a casserole dish for layering and baking, whatever works!

Succotash:

1 large zucchini, cubed
1 large yellow squash, cubed
2 sweet red peppers, diced
2 tbsp. butter
Salt & Pepper

Combine all of the above ingredients in a saute pan over medium heat until vegetables are semi-soft, they will have time to cook down more inside of the pie when it goes into the oven.

Mashed Potatoes:

4-5 medium size russet potatoes, cubed
1 clove garlic
1/2 stick of butter
1/4 cup milk
Salt & Pepper

Boil potatoes and garlic clove in large pot of water until soft. Drain water and add remaining ingredients. Use masher or mixer to bring potatoes to a fluffy consistency.

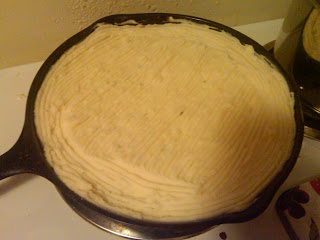
Layer each of the above into a baking dish or skillet as follows:

1) MEAT!


2)Succotash

3) Mash


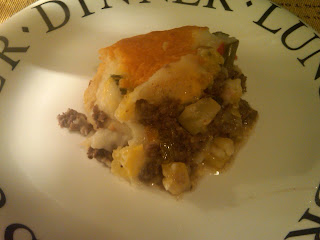
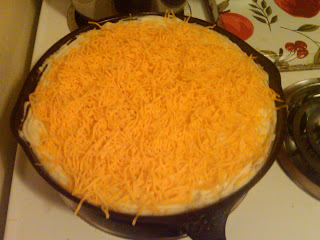
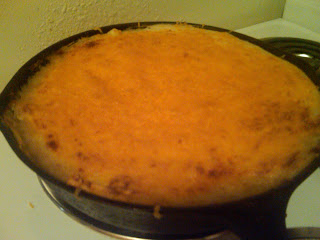
When finishing off the mash, it's customary to use a fork to score the top of the pie before baking, as you can see above. From here you can finish in a 350 degree oven as is, or you can cover it in shredded cheddar cheese first. This is not a traditional or English practice, but it's been popularized and is quite delicious. We chose cheese, 20 minutes in the oven and then I finished it off under the broiler for a few minutes to brown the top. It was really good.


Thursday, August 25, 2011

Pesto! (With shrimp and veggie farfalle)

Glorious!
I got an unreasonable amount of pesto from work today. The ladies where I work have a little garden behind the building, and someone planted way too much basil without any actual intention for it. Someone asked me today, "So what do you put basil in?" at which point I felt free to help myself to the basil. I got enough for 3 batches of pesto and some fresh left over. Don't worry, there's still plenty of basil at work- and I'm taking some pesto back to help enlighten them.

Once my delicious fresh pesto was put together, I whipped up some pasta using the veggies in my fridge, some shrimp, and a crusty loaf of french bread. What a great summer dinner!


Ingredients:
  • 2 c basil, packed
  • 1/2 c extra virgin olive oil
  • 1/2 c freshly grated parmesan cheese (puh-puh-puh-PLEASE don't use the Kraft pre-grated nonsense!)
  • 3 cloves garlic, chopped garlic
  • salt and pepper to taste
  • 1/3 c pine nuts (optional)

Directions:
1. Combine all of these ingredients in a blender or food processor.
2. Press- "Blend" and wait for 30 seconds- 1 minute.

3. Mix in a few spoons full with whatever delicious pasta and veggies you have, and store the rest in a jar or tupperware in the fridge.


Voila! That was so stinkin quick and easy :)

Friday, August 12, 2011

Spanakopita

Travis and I had the best Spanakopita at a Greek restaurant in Cincinnati and have been craving it ever since. This recipe took a lot longer to make than I thought it would but it was worth it! The method of cooking they used, to grill it on a flat top grill instead of baking it, was something I have never seen before. And the creaminess of the Spanakopita was so good. I adapted the recipe I found below so that we could make it more like theirs. My only substitution to this recipe was that I made it with goat cheese instead of feta. I also changed the cooking method which can be found at the end of this recipe.

I served this Spanakopita with Falafel Sandwiches and a Cucumber and Tomato Salad.

Ingredients
Makes about 30 Spanakopita

1/3 cup olive oil
2 pounds spinach, washed and drained
1 bunch scallions, white and green parts, chopped
1/4 cup finely chopped parsley
Salt and freshly ground black pepper
1/2 pound feta cheese, crumbled (I used goat cheese)
1 to 2 eggs, lightly beaten
1 cup (2 sticks) unsalted butter, melted
1 pound filo pastry sheets

Directions
Heat 1 tablespoon of the oil in a large saute pan, add half of the spinach and saute until spinach wilts, tossing with tongs, about 2 minutes. Remove spinach and squeeze out excess liquid, then chop roughly. Repeat with remaining spinach, using 1 more tablespoon of olive oil. Pour off any liquid from the pan, and add remaining olive oil. Add scallions and saute until soft, about 2 to 3 minutes. Add the spinach to the scallions, along with the parsley, salt and pepper. Cook over low heat for 1 to 2 minutes, then remove from heat to cool. (This part can be done ahead and kept refrigerated).

Stir the feta and as much beaten egg to moisten the cooled spinach mixture.

Preheat the oven to 350 degrees F. Brush a baking sheet with some of the melted butter.

Unroll the filo dough on a flat surface and keep it covered with waxed paper and a damp towel so it doesn't dry out and become brittle. Using a sharp knife, cut the filo in half lengthwise, and recover with the towel. Use a pastry brush to brush a strip of filo with melted butter. Place a small spoonful of spinach filling 1 inch from the end of the pastry. Fold the end over the filling to form a triangle, then continue to fold up the strip in triangles, like folding up a flag. Continue with remaining strips of dough, placing filled triangles on the baking sheet and keeping them covered with a towel until all are ready to bake.

Brush the triangles lightly with butter, then bake for 20 to 25 minutes, or until golden and crisp. Serve hot. (These may be frozen before baking, layering waxed paper between layers of triangles to keep them from sticking. Bake frozen triangles an extra 10 minutes.)

My Cooking Variation: Heat a large skillet over medium heat and melt a Tbs of butter. Place Spanakopita triangles in the skillet until brown on both sides.

Thursday, August 11, 2011

Pecan Crusted Salmon and sides

This one came together quickly and was really yummy!

The spicy pecan crusted salmon came prepared from the grocery store. I didn't touch the green beans except to wash and season them, and the rice was super throw-together. All of that being said, it was tasty!

Ingredients:
  • 2 salmon filets, marinated or coated
  • 1/2 lb fresh green beans
  • 1 c long grain rice
  • 1/2 c marsala wine
  • 1 c sliced mushrooms
  • 2 dashes of soy sauce

Directions:
  1. Preheat oven to 350.
  2. In a sauce pan, combine 1 c rice, 1 1/2 c water, 1/2 c marsala wine, mushrooms and a few dashes of soy sauce. Bring to a boil then reduce heat to low, and simmer with lid on for 15 minutes. Do not remove the lid while the rice is cooking.
  3. Bake the salmon at 350 for 20-25 minutes. About 10 minutes into baking the salmon, pop the green beans in the oven. I topped them with butter, salt, pepper, garlic powder, and drizzled them with honey. Baking for about 10 minutes kept them nice and crisp.

Mango Pear Salsa

I know I need to take pictures - forgive me. That will just force me to cook this again ... heaven forbid. :)

Mango Pear Salsa

Perfect as a side for tacos, quesadillas or any citrus-ey fish/chicken.

Ingredients:

1 mango

1 pear

¼ small red onion

2-3 tablespoons lime juice

sprinkle of pepper

Yields: side dish for two

Prep/cooking time: less than five minutes

  1. Dice the mango and pear into small, 1-inch or ½-inch cubes.
  2. Dice the red onion – smaller, the better.
  3. Mix.
  4. Sprinkle with lime juice. Mix.
  5. Add the pepper. Mix

Wednesday, August 10, 2011

Zucchini Bread


I'm getting better at this, taking pictures and baking that is. Fred revels in the fact that he's a better baker than I am. My competitive nature just will not allow this and practice makes perfect, so I've stocked up on sugar and flour. I'm even planning to bake a cake for Casey's birthday cookout next week, which I'm super excited about! Recipe and photos to come!

I've never made zucchini bread before, surprise, but my mom gave me some fresh zucchini from her garden this weekend while I was home. I stole the recipe from Paula Deen, who I heart. Changes - no nuts and baking powder instead of baking soda and salt. The conversion is 2:1 powder to soda and skip the salt. Pretty easy though, here it goes:


3 1/4 cups flour
4 tsp. baking powder
1 tsp. nutmeg
1 tsp. cinnamon
3 cups sugar
1 cup vegi. oil
4 eggs, beaten
1/3 cup water
2 cups sliced zucchini
1 tsp. lemon juice


Just a note on the zucchini, it was recommended that the vegetable be shredded, but I wanted to (thinly) slice mine so that you could actually see the zucchini in the bread.

Preheat oven to 350 degrees. Prepare ingredients and two large bowls, one for the dry ingredients and one for the wet ingredients. Once both bowls have been mixed, form a well in the dry ingredients and pour the wet ingredients into the center of the well. Fold all ingredients together.

This recipe is somewhat large and yields several different portion sizes: 2 standard loaf pans, 5 mini loaf pans, or any large rectangular dish (I used my lasagna dish). Place in preheated oven and bake for an hour. If using mini loaf pans check after 40 minutes, but not before 30. When baking, always wait at least 30 minutes before opening the oven door. This can cause the cake or bread to fall. To check readiness, insert a toothpick into the center of the dish and remove. If it pulls clean the baking is complete!

I shared this with the guys at work and they all really liked it! My skills are improving ;) On another note, I had thoughts about making this into a savory bread, so did some research on it. To alter the recipe, next time I'll skip the cinnamon and nutmeg and replace it with chopped onions and feta cheese. Also, cut the sugar to 1 cup honey. Gonna give it a try and see how it turns out. If you beat me to it, let me know how it goes!


Monday, August 8, 2011

White Bean and Ham Soup

With cancer and chemo treatments it is important that I eat a lot of fiber. So bring on the beans! This ham and soup recipe is great if you cook a bone-in ham and have leftovers. However if you do not have a leftover bone-in ham like me you can also use pre cubed ham which can be found in the cold section of your grocery store near the bacon. However, if you use cubed ham, or a ham steak and cube it, make sure you check the sodium content of each because some are extremely salty, which will lead to an overly salty soup. If you end up with an overly salty soup the best thing to do is drain off some of the broth, replace it with water, and reheat before serving. This soup is great served with corn bread.

Ingredients
Serves 8

1 lb of dry white beans - Navy or Great Northern - about 2 1/2 cups
2-3 lbs of ham hocks or shanks
2 teaspoons Herbes de Provence, or Italian seasoning
1 Tbs of butter
1 cup of diced onions (about 1 small onion)
1 cup chopped celery (about 2-3 ribs)
2/3 cup chopped carrots (about 1 medium carrot)
2-3 cloves garlic, diced
Tabasco sauce
Salt and pepper
Fresh parsley

Directions

1 Soak the beans according to the package directions, drain and rinse.
2 Cook the vegetables in 1tbs of butter. Add the ham, herbes de Provence or Italian seasoning, and beans. Fill the pot with water until everything is almost covered. You can add more water as you cook the soup, as the beans will absorb a lot of the water.
2 Bring to a simmer and simmer for about two hours until the beans are soft and the ham meat easily pulls away from the bone. Pull the meat off the bone and discard the bones. You can also use a slow cooker and cook on low for 6 to 8 hours.
3 Add several drops of Tabasco to taste. Add salt and pepper to taste. Serve with a pinch of chopped fresh parsley.

Quiche Lorraine

Attention all adoring fans I am back!!! After a month of surgery and my first chemo treatment I am finally back in the kitchen! I hope you enjoy this quiche recipe, Travis and I thought it was a delicious bacon lovers delight and it was very easy to make. I served the quiche with a side salad.

Ingredients
Serves 6

1 recipe pie dough or a prepared frozen pie crust
1/2 pound of bacon (you can use more or less to your taste)
1 cup milk
1/2 cup heavy cream
3 eggs
1/2 teaspoon salt
Black pepper to taste
1/8 teaspoon ground nutmeg
1 cup shredded swiss or other cheese (I used cheddar)
1 heaping tablespoon chopped chives

Directions


1. If you are making your own pie crust start here: Roll out the pie dough into a 12-inch round. Place it in a 10-inch wide, 1 1/2-inch high tart pan, pressing the dough into the corners. Use a rolling pin to roll over the surface of the tart pan to cleanly cut off the excess dough from the edges. Freeze for at least half an hour and then follow the directions for the frozen crust.
If you are using frozen crust start here: Preheat oven to 350°F. Line the frozen crust with heavy duty aluminum foil or with parchment paper. Allow for a couple inches to extend beyond
the sides of the tart or pie pan. Fill two-thirds with dry beans or other pie weights (I've heard copper pennies work well for this too). If you are using a pan with a removable bottom, place the pan on a rimmed baking sheet
in the oven to catch any spillage. Bake for 20 minutes. Then remove from oven, remove the pie weights (the easiest way to do this is to lift up the foil by the edges) and the foil. Using the tines of a fork, poke little holes all around the base of the crust. Return to the oven and bake for another 10 minutes, until lightly browned all over. Remove from oven and set aside.

2 Cook the bacon. Heat a large frying pan on medium heat. Arrange strips of bacon in a single layer on the bottom of the pan (you may need to work in batches or do two pans at once). Slowly cook the bacon, turning the strips over occasionally until they are nicely browned and much of the fat has rendered out. Lay the cooked strips of bacon on a paper towel to absorb the excess fat. Pour fat out of the pan into a jar (not down the drain, unless you want to clog the pipes) for future use, or wait until it solidifies and discard in the trash. Chop the cooked bacon crosswise into 1/4-inch to 1/2-inch pieces.

3 Preheat oven to 350°F. Whisk the eggs in a large bowl. Add the nutmeg, salt, black pepper and chives and whisk a little more. Add the milk and cream and whisk vigorously to incorporate and introduce a little air into the mix – this keeps the texture of the quiche light and fluffy. Arrange the bacon and cheese in the bottom of the pie crust. Whisk the egg-milk mixture hard again for a few seconds, then pour it gently into the pie crust. You want the bacon and cheese to be suspended in the mix, so you might need to gently stir it around just a little. You also want the chives, which will float, to be evenly arranged on top, so move them around with a spoon until you like where they are.

4 Put the quiche into the preheated oven and bake for 30-40 minutes. (If using pan with removable bottom, be sure to place a rimmed baking sheet underneath.) Check for doneness after 30 minutes by gently jiggling the quiche. It should still have just a little wiggle. (It will finish setting while it cools.) Cool on a wire rack. Eat at room temperature, cold (a quiche will keep for several days in the fridge), or reheated gently in a 200-degree oven.

Sunday, August 7, 2011

Herbed Faralle and Steak Salad

FUHGETABOUTIT! This salad rocked me, and it could rock you too if you just follow these easy steps...


Joe's Review:"That's why I put a ring on it..."


  • The Dressing
    • 1/2 c lemon juice (fresh squeezed with a little pulp is perfect)
    • 1/4 c grapeseed oil
    • 1/4 c finely grated parmesan
    • 1 clove garlic smashed and chopped
    • a few dashes of cracked black pepper
 Combine all of these ingredients in a bowl and whisk. Set aside in the Fridge.


__________________________________________________


  • The Salad
    • 1 c chopped romaine
    • 1 c chopped spinach
    • 1/2 c chopped cabbage and carrots (cole slaw mix... for crunch!)
    • 1/4 c chopped basil
    • 1 wedged tomato
    • 6 quartered mushrooms
    • bleu cheese crumbles
    • 1/2 lb farfalle pasta
Combine all chopped ingredients in a salad bowl and toss. Prepare pasta as directed, drain and rinse in cold water. Combine salad, pasta and dressing; toss.


_______________________________________________


  • The Steak
    • 1 12 oz New York Strip Steak
    • 3 T cajun spice
    • 1 T salt

Using high heat, heat a cast iron skillet on the stove top. Season both sides of steak, season pan with additional salt. When it is very hot, cook the steak for 2 minutes on each side for a total of 8 minutes. Then let it sit for 7 minutes, so the juices stay in the steak when you cut it. There's something really rewarding about cooking your steak just right. This steak was perfect! Don't over think it and let it rest after cooking. You'll probably be spending 7 minutes fanning the smoke detector with an oven mit if you're anything like me... Be sure to crack a window!


Add the steak to the salad, top with bleu cheese crumbles. Enjoy this hearty summer delight!


Steak juices mix with the salad as you eat and make the whole experience so savory and delicious! This dish was fun to make and a total treat to eat :)

*Happy birthday to my big bro! He loves to eat my food :)

Saturday, August 6, 2011

Parmesan Crusted Chicken Salad

Joe's Review: "That was the best... salad... ever... Best salad ever."

I'm lucky enough to have an entire Saturday to myself, today. What I like to call, "A nice little Saturday," if you will. Amidst my nice little Saturday of crossing things off  "the list," I took a breather to grab some miscellaneous things from the grocery store and get creative in the kitchen. The salad was perfect! Crunchy, flavorful, hearty, and so tasty!


Ingredients:
  • 1/2 c chopped Romaine lettuce
  • 1/2 c chopped spinach
  • 1/2 c cole slaw mix (finely chopped carrots and cabbage)
  • 1/4 c chopped fresh basil
  • 1 tomato cut into thin wedges
  • 1 lg chicken breast sliced into two thin pieces
  • 1/4 c grated parmesan cheese
  • 1/4 c panko bread crumbs
  • 1 egg

Directions:
1. Preheat oven to 375 F. Spead a small amount of cooking oil onto a baking dish.


2. Mix panko bread crumbs and parmesan in a flat dish. Beat the egg in a separate dish. Dredge the washed chicken in egg then the crumb/cheese mixture.


3. Lay the pieces on the baking sheet and bake for 20 minutes. Flip them half way through.


4. While your chicken is cooking, throw all of the veggies in together.


5. If you have a broiler, pop the chicken in there for 2 minutes on each side to get extra crispy. Then slice the chicken and layer it over the greens. Top with your favorite dressing :) We had balsamic vinaigrette- it was SO tasty!!

Thursday, August 4, 2011

Cayenne Chicken with Avocado Salsa


This meal left Fred and I sweating! We upped the cayenne and LOVED it! That is, until about an hour after eating dinner, when the heat finally hit our bellies in an angry wave of indigestion.


Cayenne Chicken:

4 boneless, skinless chicken breasts
1/4 tsp. salt
1/4 tsp. ground pepper
1/2 tsp. cayenne pepper
1 tbsp. olive oil

Avocado Salsa:

1 whole avocado
1/2 cup diced red onion
1/2 lime
1/4 tsp. cumin
1/4 tsp. garlic powder

I served this meal with rice, so before getting started, I got out my rice cooker and placed 1/2 cup of rice, 1 cup of water and 1 chicken bullion cube in the cooker and hit cook! The bullion cube is a nice trick for adding flavor to your rice. You can also use chicken broth instead of water for the same flavor effect.

Start by combining salt, pepper and cayenne pepper in a small bowl. Rub dry spices onto chicken and set aside. Pour olive oil into a frying pan over medium heat and when hot carefully add pieces of rubbed chicken one at a time into the pan. Cook until lightly browned on both sides, approximately 5 to 8 minutes per side. Once browned, place the chicken pieces into a 350 degree oven until fully cooked, this will ensure that the chicken remains moist and doesn't dry out too much on the stove top. Also, the cayenne pepper will send your nose into fury when it begins to burn off, so finishing it in the oven will give your senses a break. I used my cast iron skillet to brown the chicken and its usefulness allowed me to place the pan directly in the oven to finish. I love love love my cast iron skillet, in case you couldn't tell!

Once the chicken is in the oven, you can begin on the avocado salsa. I should have taken a useful video on how to slice and dice up an avocado, but I didn't, so here's a short video FYI a la YouTube:


Once diced, squeeze in the juice of half a lime and fold in diced red onion and spices to finish the salsa. When I make guacamole, the recipe is almost identical, except I mash up the avocado slightly, but not completely, after dicing and then add in some diced tomatoes.

Cover fully cooked chicken with avocado salsa and serve with rice, fresh lime quarters, warm tortillas and a cold glass of pinot grigio for a visually and tastefully delicious meal!

Tuesday, August 2, 2011

Lemon Risotto with Garlic Crab

Delish! I don't find myself cooking with lemon very often, but that may change after discovering this yummy risotto recipe. It would go great with chicken, fish (or any type of sea food) or fresh garden veggies :)

For your dining pleasure:


(From Oprah.com)
Ingredients-
  •  1 lb lump crab meat
  • 1 clove garlic, minced
  • 5 cups low sodium chicken or vegetable broth
  • 3 T fresh lemon juice
  • 2 T extra-virgin olive oil
  • 2 shallots finely chopped
  • 1 1/2 c arborio rice
  • 1 T grated lemon zest
  • 1 t fresh thyme leaves
  • 2 t kosher salt
  • 1/2 t freshly ground pepper

Directions-
1. Place crab meat in a medium bowl. pick through for any shells and discard. Add garlic and toss well. Refridgerate.
2. In a large sauce pan, bring broth and lemon juice to boil; reduce to simmer. Add lemon juice and keep warm on a back burner.

3. In a large, heavy-burner sauce pan over medium heat, add 1 T olive oil. When just smoking, add shallots and stir quickly with a wooden spoon until lightly golden brown and tender. Add rice and stir 1 minute to coat. Add 1/2 c broth. Continue cooking until almost all liquid is absorbed, then add another 1/2 c broth. Continue doing this until rice is tender and almost all broth has been used (25-30 min).

4. Remove from heat, add crab, stir until blended. Add 1/4 c broth and remaining 1 T olive oil, lemon zest, and thyme; stir to combine. Season with salt and pepper and serve.